Monday 23 October 2017

Missing you

Good evening all, I'm a little bit late with this weeks post as we've had a very hectic weekend. It started with a lovely Thai meal out with my NCT girl friends Friday night. Breakfast on Saturday with my Dad and Uncle, followed by a girly shopping trip with my Mother in law and Sister in law, then out to my amazing friend and up-line's wedding party Saturday night. Then Sunday we went to view the photos from a photo shoot we'd had done of the four of us a little while ago and then back to Dad's for Sunday lunch. It was nice to go back to work today for a rest!

Stampin' Up! Oh So Eclectic

Somehow while doing all of that I managed to squeeze in a bit of crafting! Pickle even decided to give me a hand with the cutting!


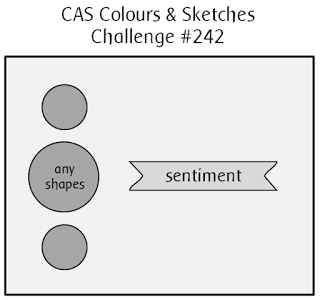
Today's card was inspired by the CAS Colours and Sketches challenge which this week was a colour challenge. I have to admit, Night of Navy is one of my favourites but the other two I very rarely touch. It's nice to get out of my comfort zone every so often and use colours that aren't my first choice.


I was quite tired while making this card so I made a couple of mistakes, one of which actually turned out to be a happy accident. I'd taken out my eclectic layers dies and thought it would be nice to use the leaves die so you could see the layer of lemon lime twist card through the white card stock. So I happily rolled it through my big shot expecting it to create a lovely cut through piece. Only problem was I'd used the die that embosses not cuts....whoops! I had already wasted several bits of card stock, as I had a real problem reading measurements while making this one, I decided I wasn't going to throw it away. I grabbed my aqua brush instead and just painted over the leaves. I hope you'll agree that it turned out quite nicely! 

Stampin' Up! Oh So Eclectic

I hope you all enjoy the rest of your week and I'll be back next week.

Sunday 15 October 2017

Santa Scene

Good morning all, I can't believe it's Sunday already, this week has gone so fast. Luckily this weekend we haven't been that busy so I've been able to get some relaxing crafting done as well as some more organising/planning. We're off on a lovely family walk later along the old Meon railway line, we're going to take the boys on their bikes so it should be fun!

As a Stampin' Up! demonstrator we sometimes get early access to certain products, which means I get to play with them before being able to sell them to customers. The latest early release is the new alcohol markers called Stampin' Blends. These are only available to demonstrators and there isn't a customer release date yet, however if you sign up to join my team before the end of today you can choose the Stampin' Blends as part of your starter pack, meaning you get them early too! For some more of my colouring in pop over to my Facebook page.

Stampin' Up! Ready for Christmas & Santa Suit

Apart from the Christmas tree and Santa hiding behind it, everything on this card has been coloured in with my Stampin' Blends. I absolutely love them already, they are so easy to use and really enjoyable to colour with. How cute is this little dog sniffing out Santa's cookies?

Stampin' Up! Ready for Christmas & Santa Suit

Today's card has been made using the Santa Suit and Ready for Christmas stamp sets and matching framelits. I have to admit these two sets are actually ones that I put in my order and took off again several times before finally buying them, I just couldn't make my mind up. I am so glad I decided to get them, I've played with the Santa Suit set more than any of the others I bought. I've got so many ideas for the Ready for Christmas set too, including a scrapbook layout.

Stampin' Up! Ready for Christmas & Santa Suit

I hope you like today's card, I'm off to measure Rory's head for a cycle helmet! Happy Sunday everyone!

Sunday 8 October 2017

Dragonfly Dreams

Happy Sunday! It's just a quick post from me today, we have had a really busy weekend going to football training, a family BBQ and a birthday party. I can't believe it's almost over already, back to work tomorrow, boooo!! 

About a week ago I posted on Instagram the below photo of a Dragonfly we had seen on our walk back from town and my interpretation in ink. However I totally forgot to share the completed card so thought I would share it on my blog! Here is the original photo I took of the Dragonfly, you can barely see the wings in the photo.

Stampin' Up! Dragonfly Dreams

This was the photo of the my version of the Dragonfly. To stamp the wings I used Cajun Craze and Crushed Curry which I sponged onto the stamp so that I was able to achieve a good mix of colours. I then used my Cajun Craze Stamp 'n' write marker to colour in the body of the Dragonfly to stop the ink from going onto the wings. The body was also stamped again using the two step stamps in the set.

Stampin' Up! Dragonfly Dreams

I'm really pleased with how this turned out and although the wings aren't see through like the real thing I think the colour combination works well together.

Stampin' Up! Dragonfly Dreams

Once I had my Dragonfly I wasn't sure what to do next so I reached for my tablet and searched Pintrest for some inspiration. I found this lovely card made by Michelle Last which inspired me to use the dots in the set to make a frame round the card. I hope you like it!

Stampin' Up! Dragonfly Dreams

Don't forget if you'd like to have a go at making any of these cards yourself just get in touch and I can pop a catalogue in the post to you or if you're local why not come to one of my card making classes?


Sunday 1 October 2017

Building Orchids for CAS Colours and Sketches

Good morning! Before I start I just want to warn you this is quite a picture heavy post as I am a little bit in love with today's card. As I don't often say that about my own cards I hope you'll excuse the amount of photos! If you follow me on Facebook or Instagram  you'll have seen my Dragonfly post yesterday saying that I often get inspired by nature. Well on my kitchen window sill I have several Orchids and my pink one is currently in flower. Every time I see it I keep thinking I should try and replicate it with my Orchid builder set, obviously nothing is as good as nature itself but I do like my version as well. 

Stampin' Up! Orchid Builder

Today's card was also inspired by the sketch challenge over at CAS Colours & Sketches I'm not sure why when I saw it I thought of using Orchids but I did!


I had great fun creating this card with the orchid builder stamps and framelits. so I though I would include step by step photos of how I created them to show you how easy it is! First you stamp out all of your layers, I used plain whisper white this time with Berry Burst ink but it would also look good on the shimmery card stock.

Stampin' Up! Orchid Builder

Then use the matching dies to cut out all of your layers, I find the magnetic platform really helps, this way I know the borders round my layers are going to be as equal as possible and I won't accidentally cut part of my image off. It might just be me with messy die cuts without the magnetic platform though!

Stampin' Up! Orchid Builder

As I wanted a little extra colour on the petals I sponged the edges as well. Then with my pierce mat underneath to give it a soft surface I pushed the edge of my bone folder into each petal section to give it a bit of dimension. This step is not essential but it does make them stand out a bit more.

Stampin' Up! Orchid Builder

Then finally glue the layers together, I personally use glue dots between each layer as I can accurately put them where I need them and they're not messy! As a little extra touch I used my wink of Stella pen (seriously cannot get enough of this!!) on the centre of the flower.

Stampin' Up! Orchid Builder

For my card I made two of the small Orchids and one of the large ones, I then glued these on a stem cut using the seasonal layers dies. The sentiment came from the Orchid builder set as well and was stamped in Garden Green.

Stampin' Up! Orchid Builder

So what do you think? As I said I actually love this card, I think it also helped that I already had a recipient in mind when I started making this. Sometimes without realising it I'll put extra effort into a card if I already know who I'm giving it to. 

Stampin' Up! Orchid Builder